Wednesday, January 19, 2022

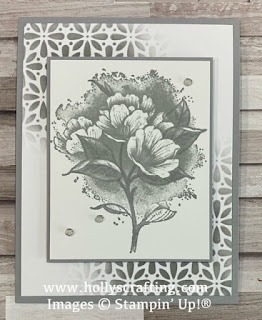
Calming Camellia with Smoky Slate


Hello my stamping friends.  I have another card for you today using the Calming Camellia stamp set.  I just love this set.  My share today is more monochromatic, and I love the simplicity of it.  I have used a birthday sentiment on this card, but you could use if for any type of card.  I have the measurements and instructions below for you.

Measurements:
 
Smoky Slate: 8½ x 5½ scored at 4¼ for the card base and 3-1/8 x 3-7/8
Basic White: 2 pieces that measure 4 x 5¼ and one that measures 3 x 3¾

Instructions:
  1. Put the mask from the Butterflies & Flowers layering decorative masks over one of the 4 x 5¼ Basic White layers.  With a blending brush, sponge Smoky Slate ink over 2 opposite corners. Adhere to card base.
  2. With Smoky Slate ink, stamp the flower image onto the 3 x 3¾ layer.  Using the Smoky Slate Stampin' Blends markers to outline and highlight the leaves.  Adhere to Smoky Slate layer and then to card front with Stampin' Dimensionals.
  3. Brush the center of the flowers with some Wink of Stella.
  4. Color some of the clear Polished Dots with the Smoky Slate Blends markers and scatter onto card front.
  5. For the inside, stamp the swirl image on 2 opposite corners and the sentiment in Smoky Slate.
  6. Stamp the flower image onto the envelope with Smoky Slate ink.


For a complete list of supplies please CLICK HERE or by clicking the image below.


Thanks so much for stopping by!! I really appreciate it.
  
To get updates in your inbox when I post to my blog, please click HERE


Customer Appreciation:


 All orders of $20.00 or more before tax and shipping placed in my online store with Hostess Code VBWW2ZDJ qualifies for the FREE PDF. This month's file includes the labels for all of the stamp sets, dies, punches and embossing folders in the Jan - Jun 2022 mini catalog.  If your order is over $150 DO NOT enter the hostess code.  You will get all the stamping rewards and I will still send you the PDF tutorial.  All qualified orders will receive the download by e-mail.  


CLICK HERE to shop with me 24/7.  


Tuesday, January 18, 2022

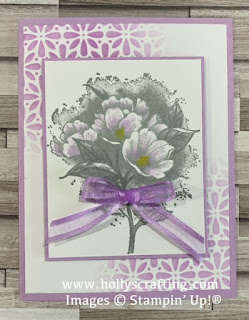
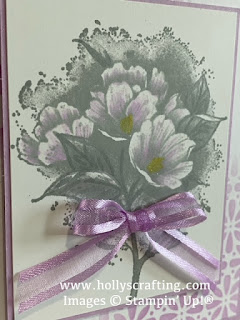
Calming Camellia with Fresh Freesia


Hello my stamping friends.  Welcome to my blog.  My project for you today is using the new Calming Camellia stamp set.  This set is part of the Sale-A-Bration brochure and is free with a $300 order before tax and shipping.  This can be an order you put in yourself, or a combined order of you and a few of your friends.  The greetings on this set are wonderful and the images are beautiful.  Below I have all of the measurements and instructions for you.

Measurements: 
Fresh Freesia: 8½ x 5½ scored at 4¼ for the card base and 3-1/8 x 3-7/8
Basic White: 2 pieces that measure 4 x 5¼ and one that measures 3 x 3¾
Open Weave Fresh Freesia Ribbon: 6-8 inches

Instructions:
  1. Put the mask from the Butterflies & Flowers layering decorative masks over one of the 4 x 5¼ Basic White layers.  With a blending brush, sponge Fresh Freesia ink over 2 opposite corners. Adhere to card base.
  2. With Smoky Slate ink, stamp the flower image onto the 3 x 3¾ layer.  Using the Fresh Freesia Stampin' Blends markers, add some color to the flowers.  Color the centers with dark Daffodil Delight Stampin' Blend.  Use Smoky Slate blends to outline and highlight the leaves.  Adhere to Fresh Freesia layer and then to card front with Stampin' Dimensionals.
  3. Brush the center of the flowers with some Wink of Stella.
  4. Tie a bow in the ribbon and add to the card front with mini glue dots.
  5. For the inside, stamp the swirl image on 2 opposite corners with Smoky Slate and the sentiment in Fresh Freesia.
  6. Stamp the flower image onto the envelope with Smoky Slate ink.


Click the image below for all of the supplies I used, or by clicking HERE


Thanks so much for stopping by!! I really appreciate it.
  
To get updates in your inbox when I post to my blog, please click HERE


Customer Appreciation:


 All orders of $20.00 or more before tax and shipping placed in my online store with Hostess Code VBWW2ZDJ qualifies for the FREE PDF. This month's file includes the labels for all of the stamp sets, dies, punches and embossing folders in the Jan - Jun 2022 mini  catalog.  If your order is over $150 DO NOT enter the hostess code.  You will get all the stamping rewards and I will still send you the PDF tutorial.  All qualified orders will receive the download by e-mail.  


CLICK HERE to shop with me 24/7.  


Sunday, January 16, 2022

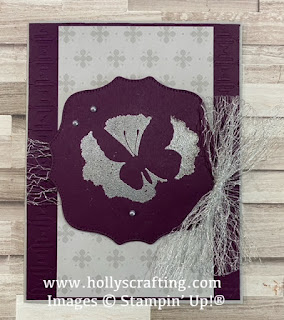
Amazing Silhouettes


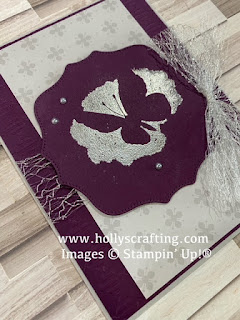
Hello my stamping friends.  Today I have a quick and simple card for you using the Amazing Silhouettes stamp set found in the Jan to June 2022 mini catalog.  I love the contrast of the Smoky Slate on the Blackberry Bliss and how it turned out.  I have all of the measurements and instructions below for you.

Measurements:
Smoky Slate: 8½ x 5½ scored at 4¼ for the card base
Blackberry Bliss: 4-1/8 x 5-3/8 embossed with the new Gingham Embossing         Folder; 3½ x 3½ cut with the Hippo & Friends die
Smoky Slate designer paper: 3 x 5¼
Basic White: 4 x 5¼
Metallic Mesh Ribbon: 14 - 15 inches

Instructions:
  1. Adhere Smoky Slate designer paper to the embossed layer of Blackberry Bliss.
  2. Wrap the ribbon around the Blackberry Bliss layer and tie a bow on the front, right side.
  3. Stamp the butterfly with VersaMark ink onto the Blackberry Bliss die cut.  Heat emboss with silver embossing power.  Adhere to card front with Stampin' Dimensionals.
  4. Scatter some silver metallic pearls to the card front.
Thanks so much for stopping by!! I really appreciate it.

For all of the supplies used you can click the image below, or HERE to add all of the products to your shopping cart.  Just uncheck the items you already have.


To get updates in your inbox when I post to my blog, please click HERE


Customer Appreciation:


  All orders of $20.00 or more before tax and shipping placed in my online store with Hostess Code VBWW2ZDJ qualifies for the FREE PDF. This month's file includes the labels for all of the stamp sets, dies, punches and embossing folders in the Jan - Jun 2022 mini  catalog.  If your order is over $150 DO NOT enter the hostess code.  You will get all the stamping rewards and I will still send you the PDF tutorial.  All qualified orders will receive the download by e-mail.  


CLICK HERE to shop with me 24/7.  


Sunday, December 5, 2021

Class in the Mail with Strong of Heart


My post for you today is a different type of post for me.  I am starting to offer classes in the mail.  These classes will be product-based classes that will include all of the cardstock precut for you and will include a complete tutorial with measurements, instructions, and pictures for 6 cards.  The class I have to offer now is using the stamp set Strong Of Heart.  Stampin' Up! created this stamp set to support heart health and $3.00 of every purchase of this set is donated to organizations that support heart health.

I have joined forces with France "Frenchie" Martin on this set and we have 6 beautiful cards for you.  The cost of this class is $46.50 plus priority shipping and includes the stamp set, a full package of Brights 6 x 6 Designer Paper (40 sheets total) and the PDF tutorial with all of the measurements and instructions.  You will cut the designer paper from your pack, but all of the other cardstock will be pre-cut for you and each card will be in a separate envelope.  Please email me at dartbabe19@msn.com if you are interested in the class.  I will send an invoice for the class through PayPal.

Thanks so much for stopping by!! I really appreciate it.
  
To get updates in your inbox when I post to my blog, please click HERE


Customer Appreciation:


  All orders of $40.00 or more before tax and shipping placed in my online store with Hostess Code DWD36B6B qualifies for the FREE PDF. This month's tutorial includes some fun fold cards and boxes for all of your gifting needs.  All of the measurements, supplies, instructions and pictures are included in this tutorial.  If your order is over $150 DO NOT enter the hostess code.  You will get all the stamping rewards and I will still send you the PDF tutorial.  All qualified orders will receive the download by e-mail.  Class in the Mail does not qualify as a purchase for customer appreciation file.


CLICK HERE to shop with me 24/7.  


Monday, November 22, 2021

Fun Folds and Techniques Blog Hop


Hello my stamping friends.  My share for you today is part of a blog hop with my team mates so be sure to click the link below to "hop" on over to the next blog.  The blog hop is all about Fun Folds and Techniques.  I chose to share with you my fun fold, which I'm calling a Double Gate Fold.  It even has a fun belly band to keep the card closed.  To receive the full PDF tutorial you will need to place a minimum order of $50 (before tax and shipping) in my online store HERE.  For this card, I have all the details below for you.

Measurements:

· Basic White Thick: 8½ x 5½, 8½ at the top score at 2-1/8 from each end for the card base

· Basic White: 2 pieces at 2¼ x 4; 2¾ x 3¾; 2 x 4

· Green print designer paper: 2 pieces at 1-7/8 x 5¼; 1½ x 9½

· Pale Papaya print designer paper: 2 pieces at 2 x 3¾


Instructions:

  1. Using Stitched So Sweetly dies, cut the 3¾ x 2¾ Basic White with the largest non-rectangle shape die.
  2. Stamp the greeting in Shaded Spruce ink at the bottom of the die cut.  
  3. Using the background image, stamp the die cut with VersaMark ink.  Make sure you don’t stamp over your greeting.  Quickly sprinkle Heat and Stick powder over the VersaMark and heat set.  It will be slightly shiny when done.  Then quickly add some Gilded Leafing.  Make sure you have the stamped area covered well.  Using stiff brush or sponge, rub the leafing to get rid of the excess.
  4. On the 2 x 4 Basic White, stamp 2 flowers with Pale Papaya ink and 1 leaf with Pear Pizzazz ink.
  5. Put tiny dots of liquid glue into the center of the flowers.  Let sit for a few minutes and then add some Gilded Leafing.  Rub with brush or sponge to remove the excess.
  6. Die cut flowers and leaf with coordinating dies.
  7. Adhere the green printed designer paper to the card base.
  8. Adhere the Pale Papaya printed designer paper to the 2¼ x 4 Basic White layers.
  9. With the card front closed, center the Basic White layers so that you have the same spacing at the top, bottom and in between the layers.  Adhere one on the left side and the other on the right side.
  10. For the inside, stamp the sentiment in Shaded Spruce and the flower in Pale Papaya.
  11. For the leaf, I masked the flower and then stamped the leaf in Pear Pizzazz.
  12. Add a few very small dots of liquid glue, let sit a few minutes and then add Gilded Leafing. Rub off excess with brush or sponge.
  13. For the belly band wrap the green printed designer paper strip around the card with the loose ends on the front.  Adhere the ends together. Make sure you don’t make the belly band too tight, but tight enough that it doesn't just fall off either.
  14. Adhere the stamped label to the belly band, covering the seam.
  15. Adhere the flowers with Stampin’ dimensionals and then tuck the leaf behind the flowers with a glue dot.
  16. Stamp a flower onto the envelope.  You can add some Gilded Leafing the same as we did on the card.


I have a video for you today as well so please click here for the video


To get updates in your inbox when I post to my blog, please CLICK HERE to subscribe.

To get the complete list of supplies I used you can CLICK HERE.  This will add all of the supplies to your shopping cart so just be sure to uncheck the items you already have.

Thanks so much for stopping by!! I really appreciate it.


CLICK HERE to shop with me 24/7.  


Thursday, November 11, 2021

Veteran's Day with Stitched Stars


Hello Stamping Friends.  My post for you today is very personal for me as I have a son in the Marine Corps.  I appreciate all of our military personnel and want to thank you for your service.  I have not played much with the Stitched Stars dies, but had so much fun putting these cards together.  If you don't have them, beginning November 16th - 18th they will be on sale at 20% off.  For three days only you will receive  10% off cardstock, 15% off ink pads (excluding ink pad bundles and third-party pads), and 20% off dies.

My card base is Night of Navy with a layer of Real Red and then Basic White.  Using the dies, I cut various sizes of stars and layered them up.  Some of the tiny stars were die cut from the Basic White layer and the Real Red layer shows through.  Below, I have more pictures for you of both the front and insides. 


Thanks so much for stopping by!! I really appreciate it.


Customer Appreciation:  All orders of $40.00 or more before tax and shipping placed in my online store with Hostess Code 337NCQZA            qualifies for the FREE PDF. This month's tutorial  includes some fun fold cards and boxes for all of your gifting needs.  All of the measurements, supplies, instructions and pictures are included in this tutorial.  If your order is over $150 DO NOT enter the hostess code.  You will get all the stamping rewards and I will still send you the PDF tutorial.  All qualified orders will receive the download by e-mail.  


CLICK HERE to shop with me 24/7.  


Sunday, September 19, 2021

Frightfully Cute Bundle

Hello my stamping friends.  I have two cards to share with you today that feature the Frightfully Cute bundle.  One of my coworker's requested 2 Halloween cards for her granddaughters.


Both cards use the Cute Halloween designer paper but the cards are so different.  

Measurements: 
Highland Heather: 8½ x 5½ scored at 4¼ for the card base, 4¼ x 3¼ cut with with largest Stitched So Sweetly scallop rectangle
Basic White: 2¾ x 3¾ cut with the 2nd largest Stitched So Sweetly scallop rectangle, 3¾ x 2, 3½ x 4¾
Cute Halloween designer paper: 2 pieces of 4 x 5¼
Black Glitter paper: 2¾ x 2¾
Old Olive: 1¾ x 2
Flirty Flamingo: 1¾ x 1

Instructions: 
  1. Put an adhesive sheet onto the back of the Black Glitter paper, then cut with the spider web die.
  2. Cut the label and the witch's hat from the 3¾ x 2 Basic White.  Stamp the greeting onto the label with Memento Black ink or Stazon.
  3. Using the broom from the Seasonal Swirls die, cut 2 Old Olive and 1 Flirty Flamingo.  Adhere to the Basic White scallop rectangle.
  4. Stamp the spider with Memento Black ink or Stazon in between the brooms.  Adhere to Highland Heather scallop rectangle with Stampin' Dimensionals.
  5. Adhere the polka dot designer paper to the card front and the boo designer paper to the inside of the card.
  6. Cut ¼ of the spider web off in a pie shape.  Adhere the large piece at the top left corner of the card front and the smaller section at the bottom right corner.
  7. Adhere the scallop rectangles to the card front.
  8. Color the witch's hat with Highland Heather, Daffodil Delight and Black Blends.
  9. Adhere the bottom of the witch's hat to the top of the label with the greeting and adhere to card front.
  10. Add some Playing With Patterns Resin Dots to the label and randomly to card front.
  11. For the inside stamp one sentiment in Memento or Stazon and the other one in Highland Heather.  Stamp the witch in Memento or Stazon.  Adhere to inside.
  12. Stamp a witch on the envelope.


Here's all of the details for this version

Measurements: 
Old Olive: 8½ x 5½ scored at 4¼ for the card base.
Pumpkin Pie: 5 x 3¾
Cute Halloween designer paper: 2 pieces of 4-1/8 x 5-3/8, 3-5/8 x 4-7/8 (Boo), 4 x 2-3/8 (Black), 1¼ x 6 for the fence (gray stripes)
Black Glitter paper: 2¼ x 3¼
Basic White: ¾ x 2¾, 1½ x 1½
Crumb Cake: 1¼ x 1¼

Instructions: 
  1. Put an adhesive sheet onto the back of the Black Glitter paper, then cut 2 trees and just the eyes of the owl.
  2. Cut the owl from the center of the Pumpkin Pie layer.  You only need to save the nose.
  3. Put adhesive sheets onto the fence designer paper and then cut the fence 3 times.
  4. Stamp the moon in Daffodil Delight and cut with coordinating circle die.
  5. Cut the owl from the Crumb Cake.
  6. Stamp the greeting onto the ¾ x 2¾ Basic White then cut with the long label die.
  7. Adhere the striped designer paper to the card front and the haunted house designer paper to the inside of the card.
  8. Adhere the boo designer paper to the Pumpkin Pie and then onto card front.
  9. Adhere the moon and the glitter tree to the right side of the black designer paper.  Make the branches and moon even with the top of the paper.  The fence will cover the trunk.
  10. Adhere all 3 fence pieces to the bottom of the black designer paper.
  11. Stamp the witch in versamark ink onto the black designer paper and then heat emboss with white powder.  Adhere this layer to the Highland Heather layer and then onto the card front.
  12. Put 2 dimensionals onto the back of the owl, making one of them cover the eyes and beak.
  13. Add the black glitter eyes to the owl along with his orange beak.  Add to card front.
  14. Adhere the greeting with Stampin' dimensionals to the card front.  Accent with 2 black matte dots.
  15. For the inside stamp one sentiment in Memento or Stazon and the other one in Old Olive.    Adhere to inside.  Adhere the other glitter tree to the bottom left corner of the inside.
  16. Stamp a witch on the envelope.
I have a complete shopping list for you that includes all of the items for both cards.  You can click HERE or on the picture below.


Thanks so much for stopping by!! I really appreciate it.  Don't forget to check out my customer appreciation tutorial below.


Customer Appreciation
. All orders of $40.00 or more before tax and shipping placed in my online store with Hostess Code P96X6XRR qualifies for the FREE PDF. This month's PDF includes the cards and boxes for all of your gifting needs.  If your order is over $150 DO NOT enter the hostess code.  You will get all the stamping rewards and I will still send you the PDF.  All qualified orders will receive the download by e-mail.  


CLICK HERE to shop with me 24/7.  


Wednesday, August 25, 2021

Delicate Dahlias - Sale-A-Bration


Hello stamping friends.  I have another Sale-A-Bration set to showcase today.  This one is Delicate Dahlias and is free with a $100 order, before tax and shipping, in my online store.  I just love this set as the flower is absolutely gorgeous.  I paired the flower with the You're A Peach designer paper.  All of the details are listed below for you.

Measurements: 
Thick Basic White: 8½ x 5½ scored at 4¼ for the card base
Basic White: 3-1/8 x 3-1/8
You're A Peach designer paper: 4 x 5¼, ¾ x 4
Calypso Coral: 3-3/8 x 3-3/8
Pale Papaya ribbon: 6" and about 8"

Instructions:  
  1. Adhere the Calypso Coral square to the designer paper making the left margin and the top and bottom margins equal.
  2. Adhere the 6" piece of ribbon across the middle of the designer paper.
  3. Ink the large dahlia full image in Pale Papaya and then using a sponge dauber, ink the edges and middle with Calypso Coral.  Stamp onto the Basic White square.
  4. Ink up the outline dahlia with Calypso Coral and stamp over the full image.
  5. For the envelope, huff on both images to stamp a lighter flower.
  6. Stamp the greeting in Memento Black ink onto the bottom left corner of the Basic White.
  7. Adhere stamped layer to card front with Stampin' Dimensionals.
  8. Tie a bow in the 8" piece of ribbon and adhere to card front with glue dots.
  9. Scatter some Genial Gems onto the card front. 
  10. Add some Wink of Stella splatters by hitting the Wink of Stella pen against your bone folder.  This will put little shimmery splatters on your card.
  11. For the inside adhere the designer paper strip to the left side.


For a complete supply list click the picture below, or by Clicking HERE.


Thanks so much for stopping by!! I really appreciate it.


Customer Appreciation
. All orders of $20.00 or more before tax and shipping placed in my online store with Hostess Code UQHDTRE3 qualifies for the FREE PDF. This month's PDF includes the labels for all of the stamps, punches, folders and dies.  If your order is over $150 DO NOT enter the hostess code.  You will get all the stamping rewards and I will still send you the PDF.  All qualified orders will receive the download by e-mail.  

CLICK HERE to shop with me 24/7.  


Sunday, August 22, 2021

Textures & Frames - Sale-A-Bration


Hello my stamping friends.  My share for you today uses a stamp set from the Sale-A-Bration brochure.  This is the second time Stampin' UP! has offered Sale-A-Bration this year, which is exciting.  This stamp set is Textures & Frames and you can choose it free when you place a minimum order of $50, before tax and shipping, in my online store.  I CASED this card from Dena Rekow as I loved her design.

Measurements: 
Gorgeous Grape: 8½ x 5½ scored at 4¼ for the card base
Bermuda Bay: 4-1/8 x 5-3/8
Basic White: 3-7/8 x 5-1/8 for the front and 3½ x 4¾ for the inside

Instructions: 
  1. Stamp with the full circle image onto the 3-7/8 x 5-1/8 Basic White, starting at the left and randomly stamp moving to the right with each color.  I used 4 colors, so you will want to be sure and clean your stamp in between each color.  My colors are Gorgeous Grape, Bermuda Bay, Coastal Cabana and Fresh Freesia.
  2. With the outline circle image, use the same ink color and stamp over the full circles, off-setting a little each time.
  3. Randomly stamp the splatter image with Mango Melody.  
  4. Stamp the greeting in Memento Black ink towards the bottom right.  I used my Stamparatus and stamped the greeting twice to make it darker.
  5. Adhere this layer to the Bermuda Bay layer and then onto the card base.
  6. On the inside layer stamp the greeting in Gorgeous Grape and the splatter image in Mango Melody.
  7. Stamp some of the circles onto the envelope as well as a few splatters.


I have a complete shopping list for you HERE.  This will add all of the supplies into your cart so just remember to uncheck the items you already have.  The Textures & Frames stamp set has an item # of 156616.

Thanks so much for stopping by!! I really appreciate it.


Customer Appreciation
. All orders of $20.00 or more before tax and shipping placed in my online store with Hostess Code UQHDTRE3 qualifies for the FREE PDF. This month's PDF includes the labels for all of the stamps, punches, folders and dies.  If your order is over $150 DO NOT enter the hostess code.  You will get all the stamping rewards and I will still send you the PDF.  All qualified orders will receive the download by e-mail.  


CLICK HERE to shop with me 24/7.