Sunday, September 4, 2022

All Bundled Up with Holly and Frenchie


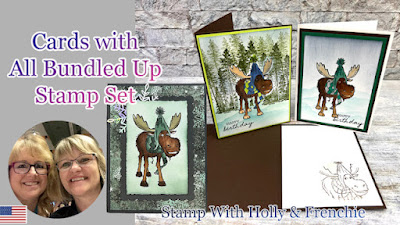
Hello my stamping friends.  I have a fun share for you today.  My bestie, Frenchie, and I did a joint video showing you how we made these adorable moose cards.  I just love this moose and it was so fun creating the video.  I am in Wyoming and Frenchie is in Texas so I'm sure glad she knew how to make this work for us.  In my part of the video I show you how I colored the moose with Stampin' Up! Blends markers and Frenchie concentrated on background techniques.  I hope you'll scroll down and watch the video.  If you like the video please like and subscribe to both of our channels.

Measurements for my card:
Smoky Slate: 4¼ x 11 scored at 5½ for the card base
Texture Chic: 4 x 5¼, ½ x 4 and ¼ x 4
Smoky Slate: 3¼ x 4¾ cut with the Scalloped Contours dies
Basic White: 2¾ x 4 cut with the 4th largest Deckled Rectangle dies
Basic White: 4 x 5¼ for the inside

Instructions:
  1. Adhere Texture Chic designer paper strips to the inside layer and then inside the card base.
  2. Adhere the large Texture Chic designer paper to the card base.
  3. Adhere the scalloped rectangle to the card front.
  4. Adhere a Wonderful Snowflake from the July-Dec Mini Catalog to the top left corner.  Make sure the tips of the snowflake are within the card base.
  5. Stamp the moose onto the deckled rectangle with Memento black ink.
  6. Use Stampin' Blends to color the moose.  Antlers are in Crumb Cake combo, hat and scarf are in Soft Succulent combo and Evening Evergreen combo, inside the ears and the tongue are in light Flirty Flamingo, the hooves are in 200 and the moose is in 400, 600 and 700.
  7. With a blending brush, lightly sponge Soft Succulent at the top part of the moose image and Evening Evergreen on the bottom.  I did not mask the moose and made sure I was using a very light hand to add the color.  Adhere to card front with Stampin' Dimensionals.

For my complete supplies list, please HERE to go straight to my online store.

For all of the details on Frenchie's cards please click over to Frenchie's Blog


You can view our video below:


Thanks so much for stopping by!! I really appreciate it.
  
To get updates in your inbox when I post to my blog, please click HERE


Customer Appreciation
 All orders of $40.00 or more before tax and shipping placed in my online store with Hostess Code NHTYC4ZN qualifies for the FREE PDF. This month's file includes 7 different Christmas cards.  If your order is over $150 DO NOT enter the hostess code.  You will get all the stamping rewards and I will still send you the PDF tutorial.  All qualified orders will receive the download by e-mail.  


CLICK HERE to shop with me 24/7.  


Friday, September 2, 2022

Linen Paper and Celebrate Sunflowers


Hello my stamping friends.  My share for you today is part of a team challenge.  My upline, Frenchie, sends us supplies and we have to use it to make a full sized card.  Then at the team meeting all that participated get their name put on the wheel.  She spins the wheel and if it lands on your name you win the cards.  It's a great way to get different ideas on using the same product.  The challenge this month is for linen paper.  I have this product, but had never used it.  I started off sponging it making an ombre background and then die cut it with the Split Card Textures die.  This was definately a labor of love getting all of the little pieces out, but I love the look of it.  I added the big sunflower and a greeting from Charming Sentiments to finish it off.  The card on the left is with linen paper and the card on the right is Basic White cardstock.

Measurements:
Crushed Curry: 4¼ x 11 scored at 5½ for the card base
Linen Paper or Basic White: 4 x 5¼
Basic Black: 3⅞ x 5⅛, 3½ x 3½, 1½ x 2
Basic White: 4 x 5¼ for inside layer and 3½ x 3½ for sunflower
Vellum: 2 x 3

Instructions:
  1. Sponge the linen paper (or basic white) with blending brushes and Crushed Curry, Mango Melody and Pumpkin Pie.
  2. Die cut sponged layer with the Split Card Textures die.  If you are using the linen paper, it has adhesive on the back so you will want to run it through Stamp N Cut and Emboss machine 2 or 3 times.  If you are using card stock then once is plenty.
  3. Adhere the die cut layer to the Basic Black layer and then onto the card base.
  4. Stamp the large sunflower onto the 3½ Basic White square with Memento Black ink.
  5. Color sunflower with Stampin' Blends markers: Calypso Coral, Pale Papaya, Daffodil Delight and Soft Suede.
  6. Put an adhesive sheet onto the 3½ Basic Black square and then die cut with the large detail sunflower die.  Remove backing off and adhere to colored sunflower.  Adhere to card front with Stampin' Dimesionals.
  7. Cut the 2 sprig images from the vellum and tuck under sunflower with glue dots.
  8. Stamp the greeting onto the Basic Black strip with VersaMark ink and emboss with White Embossing Powder.  Use coordinating dies to cut it out.  (Charming Sentiments is the bundle)
  9. Scatter some matte black dots onto the card front.
  10. For the inside, stamp the greeting in Pumpkin Pie. Stamp the small sunflower with Memento Black ink and color the same as the large sunflower.
  11. Stamp a small flower in Memento Black ink onto the envelope.
 

For my complete supplies list please click the image below:


Thanks so much for stopping by!! I really appreciate it.
  
To get updates in your inbox when I post to my blog, please click HERE


Customer Appreciation
 All orders of $40.00 or more before tax and shipping placed in my online store with Hostess Code NHTYC4ZN qualifies for the FREE PDF. This month's file includes 7 different Christmas cards.  If your order is over $150 DO NOT enter the hostess code.  You will get all the stamping rewards and I will still send you the PDF tutorial.  All qualified orders will receive the download by e-mail.  


CLICK HERE to shop with me 24/7.