Sunday, September 14, 2025

🌸 Thinking of You Card with Gallery Blooms & Beautiful Motif


Today we’re creating a soft and elegant Thinking of You card using the Gallery Blooms and Beautiful Motifs stamp sets. Paired with textured embossing, watercolor pencils, and soft color layers, this card is perfect for any occasion.


Supplies Used

  • Stamp Sets: Gallery Blooms, Beautiful Motifs

  • Embossing Folder: Exposed Brick 3D

  • Dies: Textured Notes Dies

  • Embellishments: Antique Pearls

  • Cardstock:

    • Very Vanilla (8½" × 5½", scored at 4¼")

    • Basic Beige (4" × 5¼")

    • Blueberry Bushel (3" × 4½")

    • Very Vanilla (3" × 4½")

    • Calypso Coral (3½" × ¾")

  • Ink & Coloring: Crumb Cake ink pad, Early Espresso ink pad, Old Olive & Calypso Coral watercolor pencils

  • Other Tools: Stampin’ Cut & Emboss Machine, Stampin’ Dimensionals, liquid glue, Wink of Stella or blender pen


Step-by-Step Instructions

  1. Emboss the Background

    • Ink the inside of the Exposed Brick 3D embossing folder with Crumb Cake ink.

    • Place the Basic Beige cardstock (4" × 5¼") inside and run it through your machine.

    • Use the third largest rectangle die to cut out the center, leaving only the embossed frame.

  2. Create the Blue Frame

    • Using Blueberry Bushel cardstock (3" × 4½"), cut with the third and fourth largest rectangle dies together.

    • This gives you a thin frame—set aside the center cut for another project.

  3. Stamp & Color the Focal Image

    • On the Very Vanilla (3" × 4½"), stamp the largest flower image.

    • Color with Old Olive and Calypso Coral watercolor pencils.

    • Blend using a blender pen, water brush, or Wink of Stella for a soft watercolor look.

  4. Assemble the Layers

    • Adhere the Blueberry Bushel frame to the stamped Very Vanilla piece with liquid glue.

    • Attach this panel to the Very Vanilla card base.

    • Add the embossed Basic Beige frame on top using Stampin’ Dimensionals for depth.

  5. Add the Greeting

    • Stamp the sentiment on the Calypso Coral cardstock strip.

    • Die cut with the long skinny rectangle from the Textured Notes Dies (trim as shown in the video).

    • Adhere to the card front.

  6. Finishing Touches

    • Scatter Antique Pearls across the card front for a soft, elegant accent.


Inside & Envelope

  • Stamp the inside sentiment with Early Espresso ink.

  • Add the smallest floral stamp inside and color with watercolor pencils, blending with Wink of Stella.

  • Stamp the same small flower on the envelope to tie the project together.


This creates a coordinated, elegant “Thinking of You” card with beautiful layers and soft texture.

You can purchase your supplies in My Online Store.

You can also watch My Video Here.


Thanks so much for stopping by!! I really appreciate it.
  
To get updates in your inbox when I post to my blog, please click HERE


CLICK HERE to shop with me 24/7.  


Monday, September 8, 2025

Layers of Beauty Thank you card


Today, I’m excited to share a project featuring the Layers of Beauty Bundle. We’ll be combining masks, sponging, and embossing to create a beautiful layered card with lots of texture and detail.


Supplies Used

  • Stamp Sets & Bundles: Layers of Beauty Bundle, Mixed Label Stamp Set

  • Embossing Folders: Eyelet 3D, Dotted Circles

  • Dies: Everyday Arches Dies

  • Embellishments: Starburst Sequins

  • Stampin’ Blends: Timid Tiger, Soft Sea Foam, Lemon Lolly

  • Cardstock: Soft Sea Foam, Secret Sea, Basic White


Cardstock Measurements

  • Soft Sea Foam: 8½" x 5½", scored at 4¼" (card base)

  • Secret Sea: 4" x 5¼" (x2)

  • Basic White: 4¼" x 5½"; 3½" x 4¾"

  • Soft Sea Foam: 3½" x 4¾"

  • Secret Sea: ½" x 3" (greeting strip)


Instructions

Card Front

  1. Emboss & Layer: Emboss one Secret Sea panel with the Dotted Circles Embossing Folder and adhere it to the card base.

  2. Arched Panel: Die cut the Soft Sea Foam panel with the Everyday Arches Die, then emboss with the Eyelet 3D Embossing Folder. Adhere this piece to the card front.

  3. Stamp & Color: On the largest Basic White panel, stamp the large floral image. Use the masks to apply color:

    • Flowers: Lemon Lolly (layer 1), Daffodil Delight (layer 2), Timid Tiger (layer 3)

    • Leaves: Soft Sea Foam (both layers)

  4. Cut the Flowers: Use the coordinating die to cut the large floral cluster. Fussy cut the additional flowers you’ll use separately on the card front.

  5. Greeting: Heat emboss the “Thank You” sentiment from the Mixed Label Stamp Set onto the Secret Sea strip with white embossing powder.

  6. Assemble: Arrange the flowers on the card front, popping up some pieces with Stampin’ Dimensionals. Add the sentiment strip.

  7. Finishing Touch: Randomly add Starburst Sequins for extra sparkle.

Inside the Card

  1. On the smaller Basic White piece, stamp the small flower in Basic Gray ink in the bottom right corner.

  2. Color the flower with Secret Sea, Lemon Lolly, and Timid Tiger Stampin’ Blends.

  3. Stamp your chosen greeting in Secret Sea ink.

  4. Adhere this panel to the remaining Secret Sea layer, then attach it inside the card.

Envelope

Stamp the same small flower on the bottom left corner of the envelope, and color with Secret Sea, Lemon Lolly, and Timid Tiger Blends to coordinate with your card.


And that’s it! You now have a cheerful, layered thank-you card that combines stamping, sponging, die cutting, and embossing for a professional finish.

You can watch my video and get all of the supplies in My Online Store.

Thanks so much for stopping by!! I really appreciate it.
  
To get updates in your inbox when I post to my blog, please click HERE


CLICK HERE to shop with me 24/7.  


Sunday, September 7, 2025

Joseph's Coat with Artistic Leaves


Joseph’s Coat Technique with Artistic Leaves 🍂

Today’s project features the Joseph’s Coat technique—a fun way to create rich, layered backgrounds with color and embossing.


Supplies

  • Stamp Set: Artistic Leaves (#166162)

  • Cardstock:

    • Cajun Craze – 8.5" × 5.5", scored at 4.25" (card base)

    • Secret Sea – 4" × 5.25"

    • Old Olive – 3.75" × 5"

    • Basic White – 3.5" × 4.75" (front layer)

    • Basic White – 4" × 5.25" (inside)

  • Ink Colors: Cajun Craze, Old Olive, Crushed Curry, Secret Sea

  • Other: VersaMark ink, clear embossing powder, heat tool, embossing buddy, blending brushes, open weave gold ribbon


Joseph’s Coat Technique

  1. Blend Colors:

    • On the 3.5" × 4.75" Basic White piece, blend Cajun Craze, Old Olive, and Crushed Curry until the whole surface is covered.

  2. Prepare for Embossing:

    • Use your embossing buddy over the blended piece to remove static and make sure the ink is set.

  3. Stamp & Emboss:

    • Stamp the line images from Artistic Leaves in VersaMark ink.

    • Cover with clear embossing powder, tap off excess, and heat set.

  4. Overlay Color:

    • Swipe the Secret Sea ink pad directly across the embossed panel, covering the entire background.

    • The embossed leaf images will resist the ink, allowing the blended colors to shine through.


Assembly

  1. Layer Secret Sea → Old Olive → Joseph’s Coat panel.

  2. Wrap gold ribbon around the center and adhere to Cajun Craze card base.

  3. Use a shorter piece of ribbon to tie a knot onto the wrapped ribbon.


Inside of the Card

  • Stamp the large leaf in Cajun Craze in the bottom right corner.

  • Stamp the coordinating image in Cajun Craze, stamped off once for a softer effect.

  • Lightly sponge Old Olive over the leaf for added depth.


✨ And that’s it! You now have a stunning fall-themed card using the Joseph’s Coat technique.

You can watch My Video to see how this card comes together.


Here you can find the complete supplies list.


Thanks so much for stopping by!! I really appreciate it.
  
To get updates in your inbox when I post to my blog, please click HERE


CLICK HERE to shop with me 24/7.  


Monday, September 1, 2025

Sneak Peek with Traditional Labels

Today I’m excited to share a Christmas card that combines retired favorites with upcoming new product for a fresh yet familiar design. This is a great way to stretch your crafting supplies while still creating something beautiful for the holidays.

Supplies Needed

  • Cardstock & Paper

    • Thick Basic White Cardstock – 8 ½" x 5 ½", scored at 4 ¼"

    • Mossy Meadow Cardstock – (2 pieces) 4 ⅛" x 5 ⅜"

    • Basic White Cardstock (inside layer) – 4" x 5 ¼"

    • Season of Green and Gold Designer Series Paper (retired)

      • Pattern 1: 2 ½" x 5 ¼"

      • Pattern 2: 1 ½" x 5 ¼"

      • From Pattern 1: ½" x 3 ⅞"

      • From Pattern 2: ¼" x 3 ⅞"

  • Ribbon

    • Gold & Mossy Meadow Ribbon – about 6 ½"

Prep Work

  1. Score your thick basic white cardstock at 4 ¼" to create your card base.

  2. Take one of the mossy meadow layers and die-cut your label shape from the center before adhering it—this saves cardstock since the middle won’t show.

  3. Cut and set aside the different patterned pieces from the Season of Green and Gold DSP.

  4. Prepare your ribbon at about 6 ½" in length.


Step-by-Step Assembly

Now that all of your pieces are prepped, let’s put the card together!

Step 1. Attach the two Designer Series Paper strips (2 ½" x 5 ¼" and 1 ½" x 5 ¼") together to form your card front panel. Adhere them onto the Mossy Meadow layer that has the die cut removed from the center.

Step 2. Adhere that completed Mossy Meadow/DSP layer to the card base.

Step 3. Stamp your greeting with VersaMark ink, sprinkle with gold embossing powder, and heat emboss until smooth and shiny.

Step 4. Add a few embellishments to the card front for a touch of sparkle and bling.

Step 5. On the inside layer (4" x 5 ¼" basic white), stamp your greeting with Mossy Meadow ink.

Step 6. Attach the narrow DSP strips (½" x 3 ⅞" and ¼" x 3 ⅞") along the bottom edge of the inside layer.

Step 7. Adhere the inside stamped/DSP layer to the second Mossy Meadow panel, then adhere that whole piece to the inside of your card.

And just like that, you’ve created a beautiful Christmas card mixing old favorites with new supplies!


To assemble the card please watch My Video here.

Current supplies can be found HERE.


Thanks so much for stopping by!! I really appreciate it.
  
To get updates in your inbox when I post to my blog, please click HERE


CLICK HERE to shop with me 24/7.  


Sunday, August 31, 2025

Delicate Pines Sneak Peek


Hello my stamping friends. Today I have a sneak peek of some products that will be available beginning September 3, 2025. This is a super simple layout that can be used over and over with different papers. I have all of the details below for you as well as a video.

Card Base & Layers:

  • Card Base: Shaded Spruce – 8 ½" x 5 ½", scored at 4 ¼".

  • Layer 1: Basic White – 3 7⁄8" x 5 1⁄8".

  • Layer 2: Two-Tone Pretty Peacock – 3 ¾" x 5", embossed with the So Swirly embossing folder.

Designer Series Paper (DSP): (Elegant Pine Snowflakes DSP)

  • Pattern 1: 1" x 4 ½"

  • Pattern 2: 2 ¼" x 3"

Additional Pieces:

  • Basic White (inside): 4" x 5 ¼".

  • Basic White (for stamping): 2 ½" x 2 ½". Stamp a snowflake, then die-cut.

  • Cherry Cobbler cardstock: ¾" x 4".

  • Ribbon: about 6".


Assembly Steps:

  1. Adhere Basic White (3 7⁄8" x 5 1⁄8") to the Shaded Spruce card base.

  2. Emboss the Pretty Peacock layer and adhere to the card front

  3. Layer the DSP pieces and Cherry Cobbler strip as shown in the video.

  4. Stamp the snowflake onto 2 ½" x 2 ½" Basic White and cut out with coordinating die.

  5. Attach the snowflake to your card front with dimensionals.

  6. Add ribbon for an elegant finishing touch.

  7. Insert the 4" x 5 ¼" Basic White layer inside for writing.


You can watch My Video to see how to put this card together.


Thanks so much for stopping by!! I really appreciate it.
  
To get updates in your inbox when I post to my blog, please click HERE


CLICK HERE to shop with me 24/7.  


Tuesday, August 26, 2025

Christmas Greenery Sneak Peek


Hello Friends! My share today is a sneak peek of some upcoming holiday products. Stampin' Up! has a new catalog and online exclusives available on September 3, 2025. If you don't have a demonstrator and would like a catalog, I would be more than happy to send you one. Just shoot me an email and I will get it out. 

This card is super simple and comes together quick. I have all of the measurements below as well as a video.

Measurements:
Thick Basic White: 5½ x 8½ scored at 4¼
Basic White: 5¼ x 4 (inside)
Bubble Bath: 5 x 3¾
Pool Party: 4¾ x 3½ embossed with the Traditional Wreath 3D folder
Gold Foil: 2½ x 1 and 3¼ x 1
die cut flowers from Traditions of Christmas dsp


You can watch MY VIDEO so see how it all comes together.


Thanks so much for stopping by!! I really appreciate it.
  
To get updates in your inbox when I post to my blog, please click HERE


CLICK HERE to shop with me 24/7.  


Saturday, July 19, 2025

Sunflower 3D Embossing Folder


Hello stamping friends. I am back today with WOW card. This is my first time using the Sunflower 3D Embossing Folder and I love how it turned out. I started out with a layer of basic white and embossed it with the Sunflower 3D folder. I drug Secret Sea very lightly over the debossed side of the basic white. I then used my blends to color the flowers and leaves. I am hooked and now need to try other color combinations. The measurements are simple, Secret Sea 8½ x 5½ scored at 4¼ and a basic white layer that measures 4 x 5¼ times 2 (one for the inside). I also embossed a strip of basic white 1 x 4 and drug the Secret Sea on the embossed side for the inside.


The colors of the blends used on the flowers are:

Petals: Dark Darling Duckling, Dark Daffodil Delight, Light Daffodil
Leaves: Dark Old Olive, Light Old Olive
Centers: Dark Crumb Cake, Light Crumb Cake, Light Pumpkin Pie, Light Pecan Pie, and Dark Cajun Craze (I might leave the Cajun Craze off my next card)

Thanks so much for stopping by!! I really appreciate it.
  
To get updates in your inbox when I post to my blog, please click HERE


CLICK HERE to shop with me 24/7.  


Sunday, July 13, 2025

Masculine card with Scenic Adventures


Hello stamping friends. I am back today to show you a fun fold masculine card that I saw by Sarah Simon. This card is really simple to put together but is sure to impress the recipient. I have a video below for you with step by step instructions on putting this card together.


Measurements:

Basic Black: 4¼ x 11 scored at 1⅜ & 2¾ on each end
Basic Black: 8½ x 1½ scored at 1½ & 3
Basic Black: 3½ x 2¾
Weekend Adventures dsp: 5¼ x 4
Weekend Adventures dsp: ½ x 4
Weekend Adventures dsp: 1⅛ x 4 (4 pieces)
Basic White: 5¼ x 4
Basic White: 3¼ x 2½
Cajun Craze: 4 x 1¼
Cajun Craze: 4 x 1⅛
Cajun Craze: 2 pieces 1¼ x 1¼


The supplies used can be found in My Online Store.

My Video has all of the tips on putting the card together.

Thanks so much for stopping by!! I really appreciate it.
  
To get updates in your inbox when I post to my blog, please click HERE


CLICK HERE to shop with me 24/7.  


Saturday, July 12, 2025

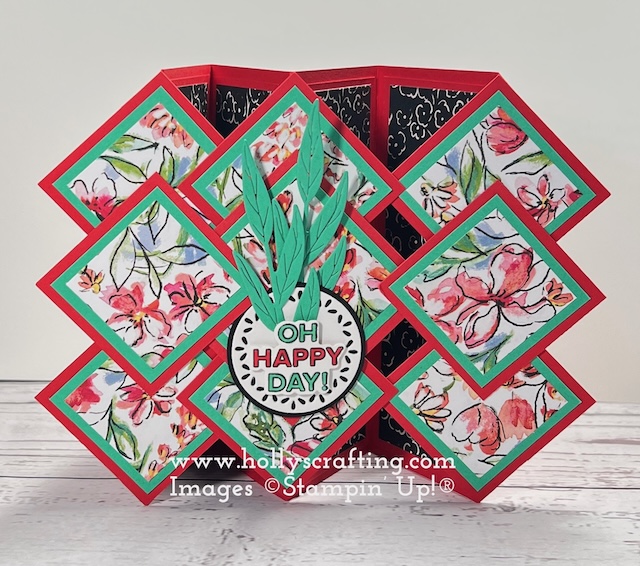
Floating Diagonal Front Panels fun fold


Hello friends. My share today is a WOW fun fold card. My team leader, France "Frenchie" Martin showed us this card at our team meeting. As she would say, it's a 50 pound card, but so worth it. This would definitely be a hand delivered card, or require extra postage to mail. The cutting of all of the squares is hardest part of putting this card together. Once you have all of your paper it is a breeze to put together. I have all of the details below in my video for you. Also a link to the supplies in my online store can be found below as well.


Measurements: 

Poppy Parade: 9½ x 5½ scored at ½, 2⅝, 4¾, 7⅞, 9
Poppy Parade: 6 pieces 1⅞ x 5¼ (2 are embossed)
Poppy Parade: 2 pieces ¾ x 5 scored at ⅜
Poppy Parade: 8 pieces 2 x 2
Poppy Parade: 2½ x 2½
Mixed Media Florals: 4 pieces 1⅝ x 5
Mixed Media Florals: 8 pieces 1½ x 1½
Mixed Media Florals: 2 x 2
Shy Shamrock: 8 pieces 1¾ x 1¾
Shy Shamrock: 2¼ x 2¼
Basic White: 1⅞ x 5¼
Basic White: Spotlight on Nature dies - 5th largest
Basic Black: 1¾ circle
Scraps of Shy Shamrock for leaves


You can interlock the diamonds to showcase the card. It will fold flat and go into a regular sized envelope too.

Supplies can be found in my OnLine Store

The video with all of the tips to put the card together can be found HERE


Thanks so much for stopping by!! I really appreciate it.
  
To get updates in your inbox when I post to my blog, please click HERE


CLICK HERE to shop with me 24/7.  


Wednesday, June 25, 2025

Mixed Florals - Heat embossing on designer paper


Hello my stamping friends. I am back today to share with you how you can heat emboss on designer paper and get a wow effect. This card is so simple, yet elegant using black and white with a pop of color (Lemon Lolly). I am not much of a yellow fan, but I love the soft color of Lemon Lolly. It is a great addition to our color families. The measurements are below, as well as the supplies and my video.

Measurements:
Basic Black 4¼ x 11 scored at 5½ for the card base
Lemon Lolly: 2 pieces at 4 x 5¼
Botanical Textures dsp: 3¾ x 5
Basic White: 3½ x 4¾
Black & Very Vanilla Check Ribbon: about 5½ inches and about 4 inches


You will find all of the supplies used in My Online Store.

My Video will show you how simple this card is to make. I made one version as a sympathy card and the other as a birthday card. With the thinking of you sentiment, you could use this card for any occasion.


Thanks so much for stopping by!! I really appreciate it.
  
To get updates in your inbox when I post to my blog, please click HERE


CLICK HERE to shop with me 24/7.  


Sunday, June 22, 2025

Beautiful Butterflies with a watercolor/salt background


Hello my stamping friends. I am sharing a simple card with you today that has a really neat background technique. By using Fluid 100 Watercolor paper, reinkers, and course salt you can make beautiful backgrounds. I have the measurements and a video for you below that shows you exactly how to create this.


Measurements:
Secret Sea: 8½ x 5½ scored at 4¼ for the card base
Floral Delight dsp: 5½ x 1¾
Secret Sea: 4¾ x 3½
Fluid 100 Watercolor paper: 4¼ x 3 & 3½ x 5
Fresh Freesia: 5¼ x 4
Basic White: 4¾ x 3½
Pastel Ombre Glimmer paper: scrap for butterfly body

All of the supplies can be found in My Online Store

You can watch My Video to see this technique in action.

Thanks so much for stopping by!! I really appreciate it.
  
To get updates in your inbox when I post to my blog, please click HERE


CLICK HERE to shop with me 24/7.  


Tuesday, May 20, 2025

Pop Out Panel Fun Fold


Hello my stamping friends. I am back today with inspiration I got from a swap card I received from Sarah Simon. This fun fold is a wow card that displays nicely and fits in a medium Stampin' Up! envelope. It will probably take extra postage as there are a few layers and folds. I have the measurements, supplies and a video for you below. Hope you enjoy.


Measurements:
Peach Pie: 8½ x 5½ scored at 2⅛, 4¼, 6⅜
Peach Pie: 8¼ x 1¾ scored at 2⅛, 3⅛, 5⅛, 6⅛
Peach Pie: 3¼ x 4¾ cut with the 3rd largest Everyday Arches
Blackberry Bliss: 3 x 4¼ cut with the 4th largest Everyday Arches
Basic White: 2½ x 4 cut with the 5th largest Everyday Arches
Basic White: cut 2 @ 2 x 5⅜, 4¼ x 3 for stamping
Floral Impressions designer paper: cut 2 @ 2 x 5⅜
Flowering Zinnia designer paper (retired) or any coordinating paper: cut 2 @ 2 x 5⅜


You will find the supplies used IN MY ONLINE STORE

I also have a VIDEO for you as well.


Thanks so much for stopping by!! I really appreciate it.
  
To get updates in your inbox when I post to my blog, please click HERE


CLICK HERE to shop with me 24/7.