Tuesday, May 20, 2025

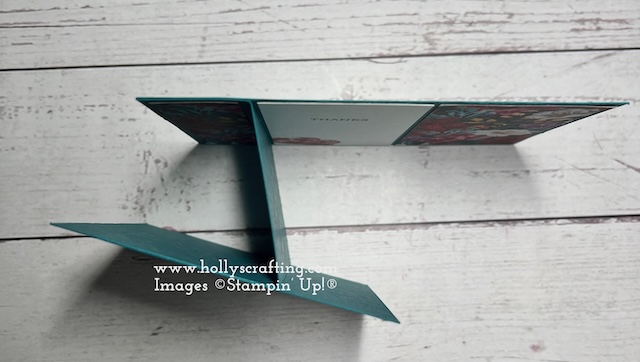
Pop Out Panel Fun Fold


Hello my stamping friends. I am back today with inspiration I got from a swap card I received from Sarah Simon. This fun fold is a wow card that displays nicely and fits in a medium Stampin' Up! envelope. It will probably take extra postage as there are a few layers and folds. I have the measurements, supplies and a video for you below. Hope you enjoy.


Measurements:
Peach Pie: 8½ x 5½ scored at 2⅛, 4¼, 6⅜
Peach Pie: 8¼ x 1¾ scored at 2⅛, 3⅛, 5⅛, 6⅛
Peach Pie: 3¼ x 4¾ cut with the 3rd largest Everyday Arches
Blackberry Bliss: 3 x 4¼ cut with the 4th largest Everyday Arches
Basic White: 2½ x 4 cut with the 5th largest Everyday Arches
Basic White: cut 2 @ 2 x 5⅜, 4¼ x 3 for stamping
Floral Impressions designer paper: cut 2 @ 2 x 5⅜
Flowering Zinnia designer paper (retired) or any coordinating paper: cut 2 @ 2 x 5⅜


You will find the supplies used IN MY ONLINE STORE

I also have a VIDEO for you as well.


Thanks so much for stopping by!! I really appreciate it.
  
To get updates in your inbox when I post to my blog, please click HERE


CLICK HERE to shop with me 24/7.  


Saturday, May 17, 2025

Mixed Florals Sympathy Card


Hello stamping friends. Today I have a quick card to share with you. I have used a sympathy greeting, but you use this card for any occasion. I love the Elements of Text stamp set as it makes great background images. I have the measurements, supplies and a video below for you. 


Measurements:
Thick Basic White: 4¼ x 11 scored at 11
Summer Splash: cut 2 4⅛ x 5⅜
Basic White: cut 2 4 x 5¼, 2¼ x 5


The supplies used can be found in My OnLine Store.


I have the video for you HERE.

Thanks so much for stopping by!! I really appreciate it.
  
To get updates in your inbox when I post to my blog, please click HERE


CLICK HERE to shop with me 24/7.  


Wednesday, May 14, 2025

Painter's Tape Background Stamping


Hello stamping friends. My share for you today is a card I did at my card class this month and it uses painter's tape for stamping. That's right, we can stamp backgrounds using painter's tape. It is really simple as you can see in my video below. The supplies for this card are simple as well. I have the measurements, supplies and video below for you.

Measurements:
Cloud Cover: 8½ x 5½ scored at 4¼
Cloud Cover: 1¾ x 7
Basic White: 4 x 5¼ * 2
Ribbon: 8 to 9 inches


Supplies can be found in My OnLine Store.


My Video shows you how this card was put together.


Thanks so much for stopping by!! I really appreciate it.
  
To get updates in your inbox when I post to my blog, please click HERE


CLICK HERE to shop with me 24/7.  


Sunday, May 11, 2025

"W" "V" Fun Fold card


Hello my stamping friends. I showed you how to make a "W" fold card. Today we are going to add a "V" to the "W". I love making fun fold cards. This one is a little thick with all of the folds, but I don't mind paying a little extra for shipping. I have the measurements, supplies and a video below for you. Enjoy!

Measurements: 
Basic White: 5½ x 11 scored at 1¾, 3½, 5¼, 7
Basic White: 6 x 3 scored at 3
Basic White: 3¼ x 4¾, 2½ x 2½
Old Olive: 3¾ x 5¼, 2¾ x 2¾
Floral & Gingham Vellum: 1½ x 5¼ * 2
Floral Delight designer paper: 1½ x 5¼


Supplies for this project can be found in my Online Store.

You can CLICK HERE to watch my video.


Thanks so much for stopping by!! I really appreciate it.
  
To get updates in your inbox when I post to my blog, please click HERE


CLICK HERE to shop with me 24/7.  


Saturday, April 5, 2025

"W" Fold card with Everyday You & Me


Hello my stamping friends. I am back today to show you my take on the "W" fun fold card using the Everyday You & Me products in the scrapbook section in my online store. These products work great for cards in addition to scrapbook pages. I have the measurements, supplies and a video for your below.

Measurements:
Lost Lagoon: 4¼ x 11 scored at 5½; 1½ x 11 scored at 2¾, 5½, 8¼
Lost Lagoon: 4 2⅜ inch circles; 3½ x 2
Basic White: 2 pieces 5¼ x 4; 2¼ x 4½
Gray Granite: 5⅛ x 4; 3½ x 2
Everyday Happiness designer paper: 5 x 3⅞; 2¼ x 4½


You can find the supplies in My Online Store

Click HERE to view my video.

Thanks so much for stopping by!! I really appreciate it.
  
To get updates in your inbox when I post to my blog, please click HERE


CLICK HERE to shop with me 24/7.  


Thursday, April 3, 2025

Country Birdhouse Diagonal Easel Card


Hello stamping friends. I am back today with a cute diagonal easel card using the Country Birdhouse bundle. There is a lot of die cutting with this card, but it turned out so cute. I have the measurements and video listed below for you.


Measurements:
Misty Moonlight: 8½ x 5½ scored at 4¼ and then diagonally from the top right corner to the score line at the bottom left
Misty Moonlight: 4¼ x 5½ cut with the Textured Notes Dies
Basic Beige: 4 x 5¼; 3 x 4¼ embossed with the Dotted Circles 3D folder
Early Espresso: 1 x 1½ 
Pool Party: 3 x 3
Basic Gray: 2½ x 3¼ embossed with the Timber 3D folder
Petal Pink: 2 x 2 
Smoky Slate: 1½ x 2
Country Woods designer paper: 3½ x 4¼


Supplies can be found in My Online Store

The video can be watched on my YouTube channel HERE


Thanks so much for stopping by!! I really appreciate it.
  
To get updates in your inbox when I post to my blog, please click HERE


CLICK HERE to shop with me 24/7.  


Tuesday, April 1, 2025

Stack, Cut and Shuffle


Do you have a lot of designer paper? Well you are not alone. My goal is to start using more of my paper so I pulled out my Regals paper stack. I love purple so I used Gorgeous Grape, Blueberry Bushel and Crushed Curry. You start with 3 pieces of designer paper that measure the same size. Then with them stacked together you make 2 different cuts. Keeping all 3 pieces together while cutting makes it real easy to shuffle the pieces and put them back together. The placement of the cuts is not important as long as you are cutting all 3 pieces at the same time. I kept the greeting simple since my papers were a little busy. I have the details below for you.

Measurements
Card Base: 8½ x 5½ scored at 4¼ (gorgeous grape, blueberry bushel and crushed curry)
Basic White: 2 pieces of 4 x 5¼ & 3 x 2¼ for the label
Designer Paper: 3¾ x 5
Crushed Curry: 3 x 2¼

The supplies can be found in My Online Store.


Thanks so much for stopping by!! I really appreciate it.
  
To get updates in your inbox when I post to my blog, please click HERE


CLICK HERE to shop with me 24/7.  


Sunday, March 30, 2025

Linked Together Bundle


Hello stamping friends. I am here today to show you the Linked Together Bundle along with the Lovely Garden designer paper. I started out with a basic white layer and used masks 1 & 3 with Melon Mambo ink for both layers. The diamond was cut from the Bubble Bath layer before embossing it with the Distressed Tile folder. The only stamping for this card is the greeting on the front. All of the flowers are cut from the designer paper. When cutting images from designer paper, don't throw away the edges as those can be used to tuck under other layers or as embellishments on the inside of the card. Below I have the measurements for you as well as a video.


Measurements:
Thick Basic White: 4¼ x 11 scored at 5½
Basic White: 4 x 5¼
Bubble Bath: 4 x 5¼
Basic Black: scrap for the greeting
Flowers cut from Lovely Garden designer paper

All of the supplies can be found in My Online Store

Pop on over to YouTube by CLICKING HERE to watch the video and don't forget to like and subscribe to my channel.

Thanks so much for stopping by!! I really appreciate it.
  
To get updates in your inbox when I post to my blog, please click HERE


CLICK HERE to shop with me 24/7.  


Tuesday, January 7, 2025

Country Flowers fun fold


Today I will show you how to create this fun fold card. It looks like the swing focal layer is a separate piece of cardstock, but it is made straight from the card base with an extra score line and a couple of cuts. I show you this in my video below.


Measurements
Misty Moonlight: 4¼ x 11 scored at 2¼ & 5½
Misty Moonlight: 2 pieces of 4½ x 2¼
DSP Pattern 1: 2 pieces of4⅜ x 2⅛
DSP Pattern 2: 2 pieces of 3⅛ x 4⅛
DSP Pattern 3: 5⅜ x 4⅛
Basic White: 2 pieces of 4¼ x 2

You can find the complete supplies list on MY Online Store.


Click HERE for the link for my video.

Thanks so much for stopping by!! I really appreciate it.

  
To get updates in your inbox when I post to my blog, please click HERE


CLICK HERE to shop with me 24/7.  


Sunday, January 5, 2025

Regal Flora Fun Fold


Hello stamping friends. I have a super easy fun fold for you today using the Regal Flora Bundle. Unfortunately, the stamp set is no longer available and the dies and paper are on the last chance list. However, this fold could be adapted to any papers and stamps that you have. The link to my supply list is below as well as the measurements. I also have a video for you below showing you how to put the card together.

Measurements
Pretty Peacock: 4¼ x 11 scored at 5½, 6¾, 8⅞
Pretty Peacock: 4 x 4¼
Cherry Cobbler: 3½ x 2
Basic White: 2 x 4 (inside) & 4¼ x 3 (stamping)
Regal Winter designer paper:
     Pattern 1: 3¾ x 4
     Pattern 2: 1 x 4 & 2 x 4
     Pattern 3: 3¾ x 1


My complete Supply List will take you to my online store and add all of my supplies to your cart. Just be sure to uncheck the items you already have.

You can view my video HERE

Thanks so much for stopping by!! I really appreciate it.
  
To get updates in your inbox when I post to my blog, please click HERE


CLICK HERE to shop with me 24/7.  


Monday, December 30, 2024

Pleated Pop-Up with Wildflower Designs


Hello my stamping friends. I am back today with another card created for my class this month. This month we focused on fun folds and this one has a real wow factor when you open it up, and it is a great way to use up patterned paper. I am sure I am not the only one that has a lot of patterned paper that I am hoarding LOL. My inspiration for this card came from a swap I participated in and was created by Lynn Feldkamp.

Card Measurements: Early Espresso: 4¼ x 11 scored at 5½ Moody Mauve: 5¼ x 4 (cut your frame out of this layer) Mossy Meadow: 5 x 3¾ Wildly Flowering patterned paper: 4 x 12 scored at 3, 4, 5, 6, 7, 8, 9 Basic White: 3¼ x 2 (label on card front) Moody Mauve: 2 pieces 2⅝ x 3⅝ Basic White: 2 pieces 2½ x 3½ Basic White: 3 x 3 (to stamp inside flowers)

The Supplies are in my online store. This link will add all supplies to your cart, so just be sure to uncheck the items you already have. I also use an upcoming embossing folder on this card that will be available on January 7, 2025. This is one of the free selections during Sale-A-Bration with each $60 order, before tax and shipping. it is called Starstruck and the item number is 164972.

I have a video for you that you can WATCH HERE or by clicking it below.


Thanks so much for stopping by!! I really appreciate it.
  
To get updates in your inbox when I post to my blog, please click HERE


CLICK HERE to shop with me 24/7.  


Sunday, December 29, 2024

Thoughtful Wishes with block stamping


Hello my stamping friends. My share today is a card from last month's card class and we focused on different techniques. In this card we used Stampin' Up!® clear block D to make the background. It's a really easy way to add color to your card. All you do is color the block with Stampin' Write Markers and then mist it with water then use the block as your stamp and press it onto a layer of the card. I used Granny Apple Green, Petunia Pop and Balmy Blue on this card. I have a video below for you as well as my measurements and supplies list.

Measurements
Thick Basic White: 4¼ x 11 scored at 5½
Basic Black: 4 x 5¼, 2⅝ x 2⅝
Basic White: 3½ x 4¾, 2½ x 2½
Petunia Pop: 1¾ x 3½
Granny Apple Green: 1¾ x 3½


Here is my Supplies List which will take you to my online store and add the supplies to your shopping cart. Just remember to uncheck the supplies you already have.

My video can be found by clicking HERE or by clicking below.


Thanks so much for stopping by!! I really appreciate it.
  
To get updates in your inbox when I post to my blog, please click HERE


CLICK HERE to shop with me 24/7.  


Sunday, December 1, 2024

Shaving Cream Technique with Poised Peony


Hello my stamping friends. Today I have card for you featuring the shaving cream technique. This is a messy technique, but you can make really cool backgrounds with it. I got my shaving cream at the dollar tree so it was really inexpensive 😁. You start out with some shaving cream (enough so that it's bigger than your layer) and add 2-4 colors of reinker. You randomly add a drop all around your layer of shaving cream, alternating the colors. Then you take a knife and swirl the reinkers into the shaving cream creating a marble effect. Lay your cardstock layer on top of the marbled shaving cream and tap it down into the shaving cream. When you pull it off of the shaving cream, you will have excess shaving cream. Take a paper towel and dab it off of the cardstock. You don't want to rub it or else your marbled colors will become one solid color. Once you have the excess shaving cream off, let it dry and then cut it down to 3¾ x 5. Save the scraps for the inside of the card. For these cards I used Blackberry Bliss, Gorgeous Grape and Highland Heather reinkers. I show you how I made these cards in the video below.

Measurements:
Highland Heather: 4¼ x 11 scored at 5½
Gorgeous Grape: 4 x 5¼
Basic White: 4 x 5¼ *2
Flowering Zinnias DSP: 1½ x 5
Blackberry Bliss: 2½ x 3¼ cut with the Greetings of the Season dies
Silver & White Sheer Ribbon: about 9"

The complete supplies list can be found in my online shop. Just be sure to uncheck the supplies you already have.


Here is the link for my video: https://youtu.be/04JUWih7JjQ


Thanks so much for stopping by!! I really appreciate it.
  
To get updates in your inbox when I post to my blog, please click HERE


CLICK HERE to shop with me 24/7.